I have been practicing using CISCO’s Packet Tracer for learning how networks function in practice.
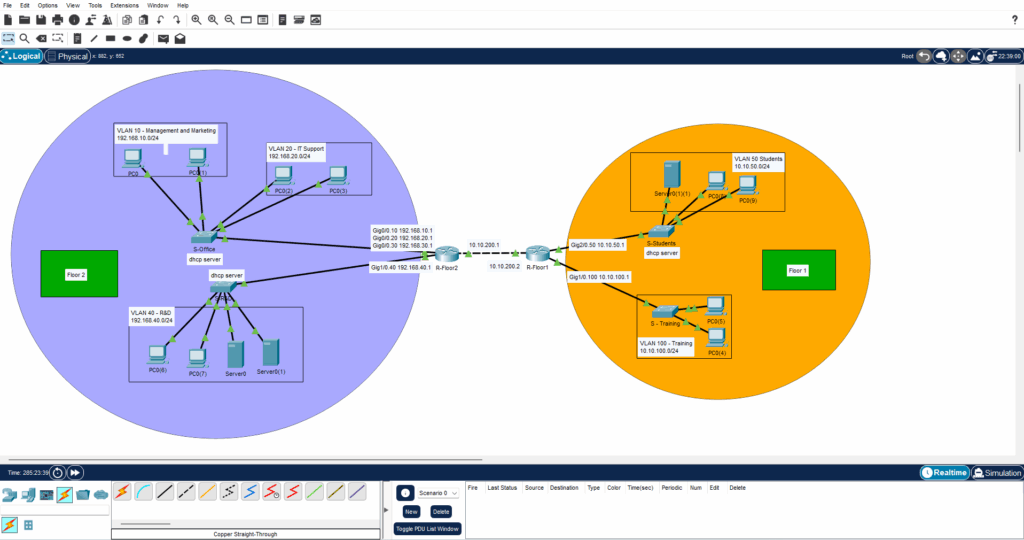
To be able to learn I made up a situation and then tried to create a topology of the network based on the details I came up with. A quick explanation of the made-up situation: The task is to create a network for a company that has two floors, tens of persons in each floor. This fictitious company has 4 departments. Each department is in it’s own VLAN.
With these details I ended-up making a topology like this:
Essentially, the upper floor and lower floor are divided based on external influence. Customer training sessions would be held on the lower floors for ease of access, and the Training department would be there as well to oversee everything. The upper floor would host the other three departments.
I have set it up so that each floor has a router, each router is connected to a switch and in each switch there are VLANs. All of the switches work as DHCP servers. I used the RIP routing protocol between routers, and ACL in the routers for basic limitation of traffic between floors and different VLANs.
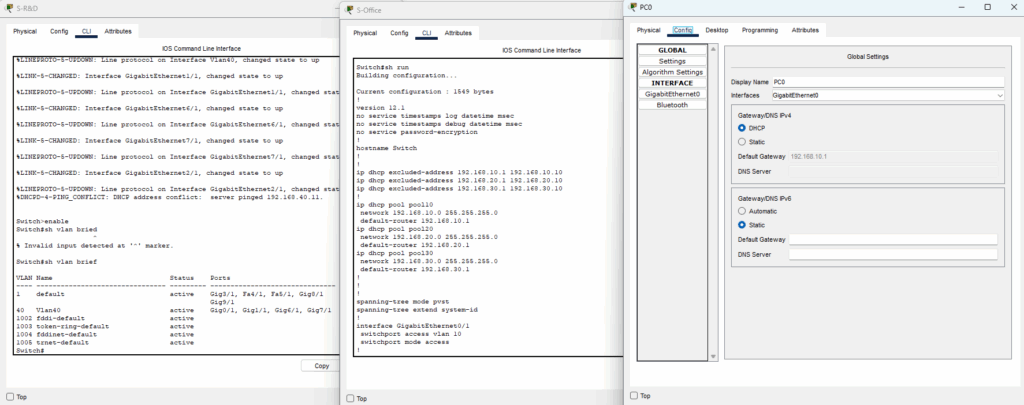
Here is a picture of the CLI of the switches and DHCP config on one of the PCs:
I’m planning to make a more in-depth blog of how to set up the system I did in the near future, as long as I have the time!
For those of you interested in learning the basics of Packet Tracer there are great online tutorials/courses on the matter provided by CISCO themselves for free. Here is a link to a main page. The courses should be easily found through it: https://www.netacad.com/cisco-packet-tracer
During the last months I have been doing some training in the tryhackme.com environment.
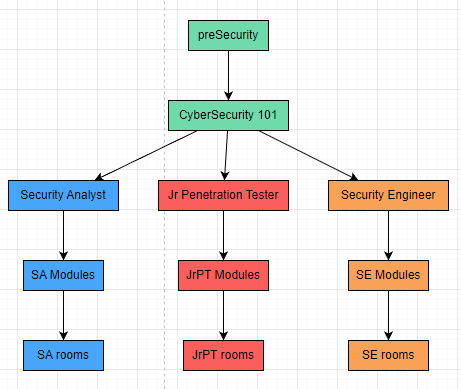
Despite the name, it isn’t just about hacking. It actually covers 3 different training paths Security Analyst, Jr Penetration Tester, and Security Engineer. There are two paths to complete before starting on those paths however. They are the “Pre-Security and “Cyber Security 101” -training paths where the basics of IT concepts are explained (with exercises).
Here is a simple depiction of the training structure, and an exemplary breakdown of the preSecurity path is shown after the first picture.
Module: Introduction to Cyber Security Room: Careers in Cyber Room: Offensive Security Intro Room: Defensive Security Intro Module: Network Fundamentals Room: What is Networking? Room: Intro to LAN Room: OSI Model Room: Packets & Frames Room: Extending Your Network Module: How The Web Works Room: DNS in detail Room: HTTP in Detail Room: How Websites Work Room: Putting it all together Module: Linux Fundamentals Room: Linux Fundamentals Part 1 Room: Linux Fundamentals Part 2 Room: Linux Fundamentals Part 3 Module: Windows Fundamentals Room: Windows Fundamentals 1 Room: Windows Fundamentals 2 Room: Windows Fundamentals 3
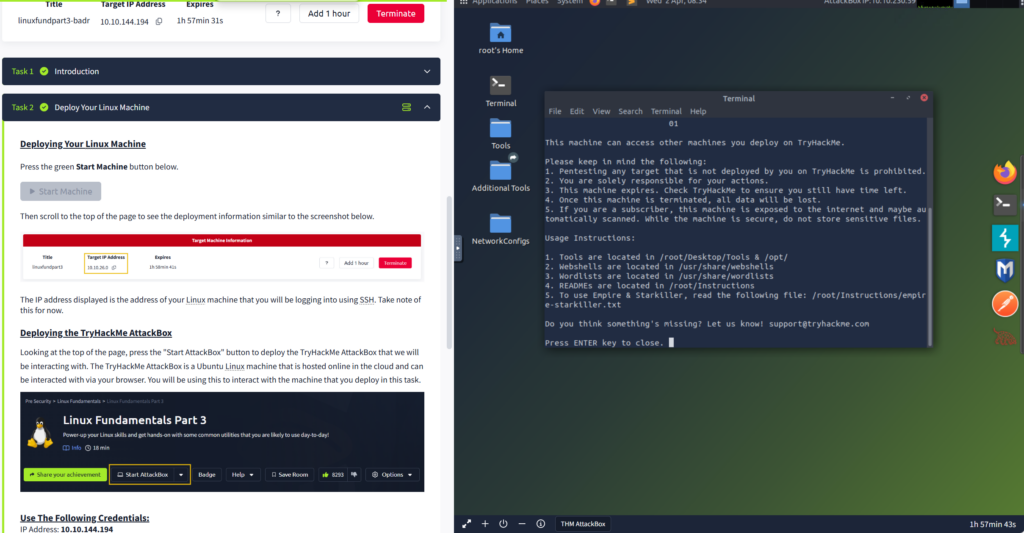
The testing rooms have a feature that let’s you test the theory with hands-on exercises. The exercises are normally done by using the “attack machine”. Below is a picture of a room with the attack machine open (instructions on the left, attack machine on the right):
And then a picture with no attack machine used, but with a practice window open:
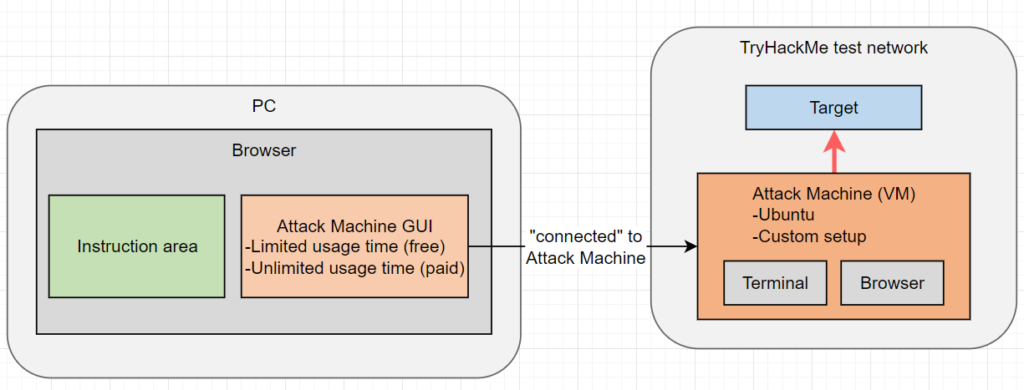
Here is a picture on my understanding of how the setup looks like:
Alternatively, one can use their own “attack machine”, eg. Kali Linux. When using this alternative setup, one need to use OpenVPN to connect to the tryhackme site. I essentially did something like this:
If you’re interested in trying similar things, follow this link to get started: https://tryhackme.com
For those interested, more information of the OpenVPN method can be found from this link: https://tryhackme.com/access
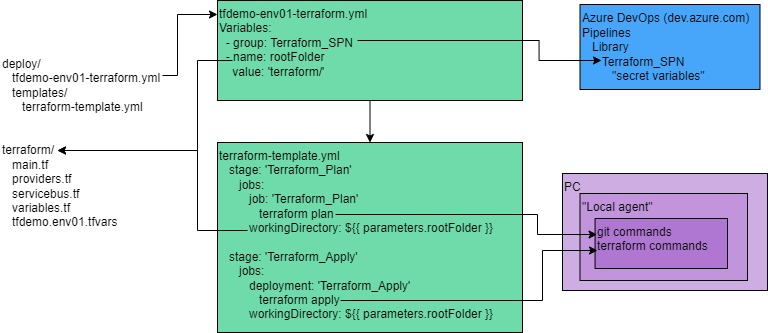
The main relationships between the files are shown in the picture below.
Pipeline defines the stages Plan and Apply, and refers to all Terraform files located in the Terraform folder. The actual Terraform commands are executed in the pool agent.
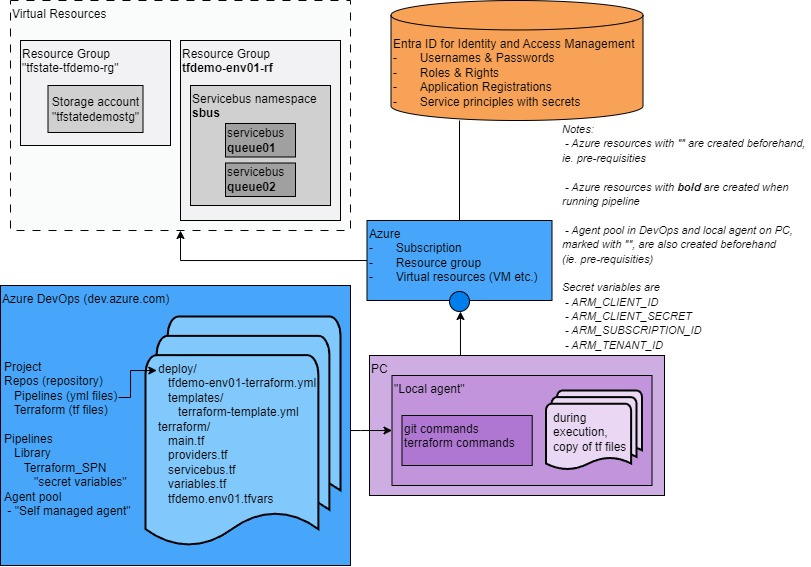
In order to get things working, one has to create self-hosted agent. The overall working setup is depicted in the picture below:
Fixing naming conflicts in files:
- providers.tf
- tfdemo.env01.tfvars
Had to define local pool in tfdemo.env01.tfvars:
- pool:
    name: Local
    demands: Agent.Name -equals MUNACER
Something not mentioned in the original instructions, is how to delete the resources you have just created.
One way to delete the resources is to use a duplicate of the pipeline and adding “-destroy” parameter to all Terraform plan and apply commands
Here is an example below:
tfdemo-destroy-part1.yml
- pointing the template to the next yml file:
  template: tfdemo-destroy-part2.yml
tfdemo-destroy-part2.yml
- adding "-destroy" to Plan and Apply stages:
  terraform plan -destroy ...
  terraform apply -destroy ...
I have been dabbling a little bit with Burp Suite. As usual, for those interested there will be links at the end.
Burp Suite is a web application testing tool, and there are two versions: A community edition, which is free. A professional edition, which has a subscription payment model.
I used Burp Suite’s community edition and I feel it is a good starting point for learning web application testing.
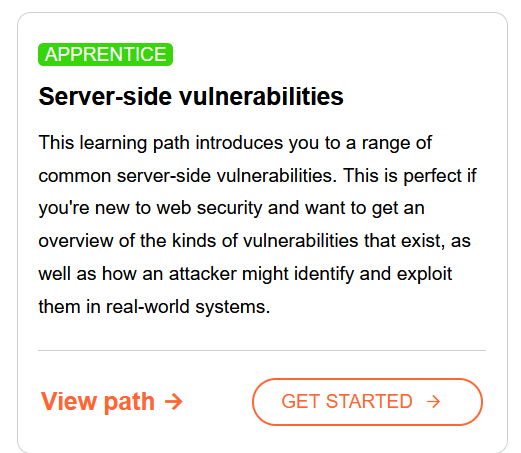
In the academy, there are many courses for learning different subjects. These courses are called “paths” and they are divided into different skill levels: Apprentice, Practitioner and Expert. I started out at the Apprentice level path “Server-side vulnerabilities”. I really enjoyed that path, and I fully recommend it as a solid starting point for beginners like me!
Each path is further broken down into Labs, a hands-on exercise to help learn a concept that was taught previously with some basic theory. I will be sharing some pictures that are related to two Labs that I had completed. The pictures show the setups of these Labs.
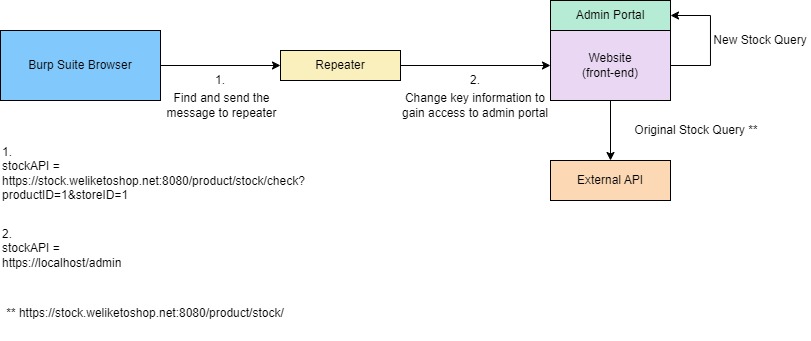
Lab: Basic SSRF against the local server
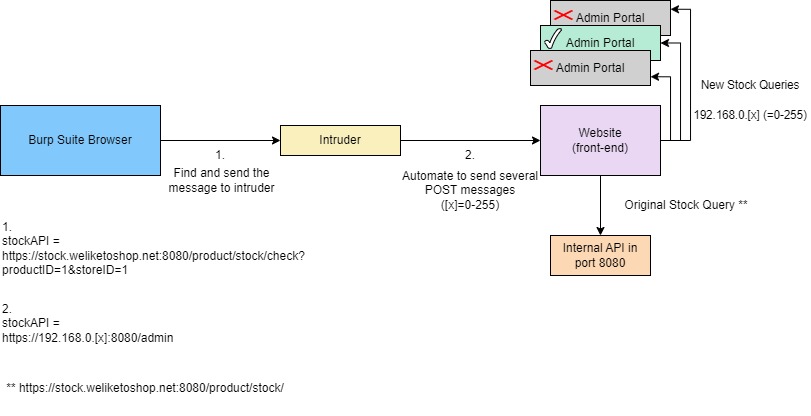
Lab: Basic SSRF against another back-end system
Trying out Burp Suite was definitely a good experience. So far i have not proceeded into other paths, having only completed “Server-side vulnerabilities”, but i might try to advance further if I have the time.
First i had to install Terraform onto the PC. During the test, I did have some trouble with naming conflicts and having to figure out some authentication mishaps, but after those were resolved it worked as intended.
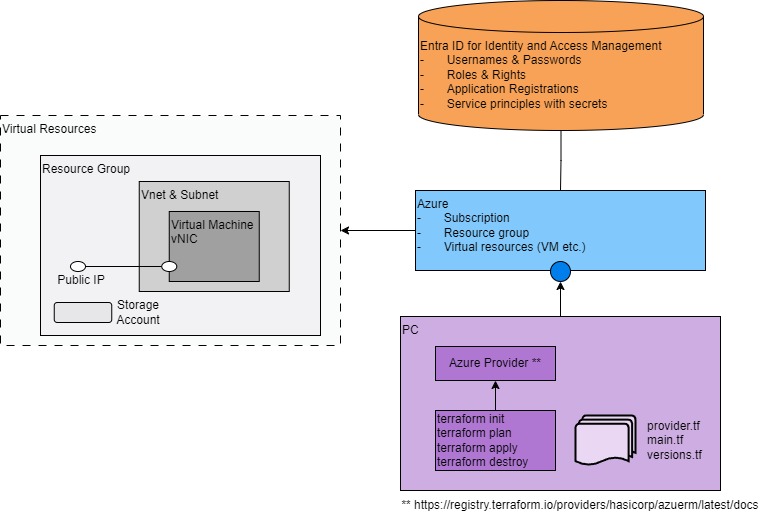
Here is a picture i made of the setup
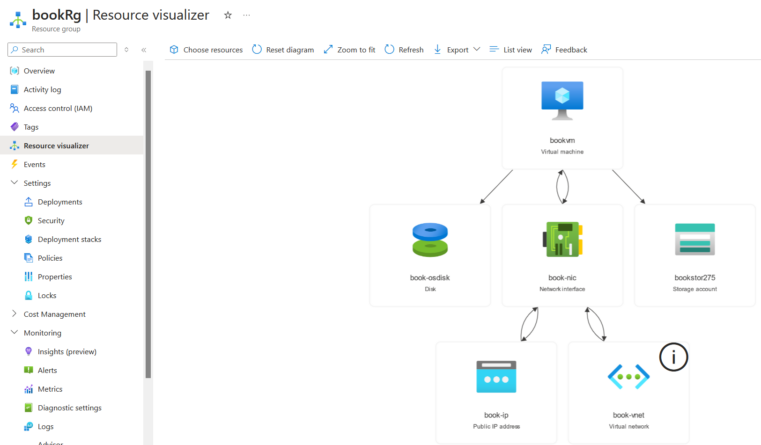
The Terraform script in the test creates various resources in Azure, e.g. VM (Virtual Machine) that is accessible from the internet. There is actually a nice tool in Azure that lets one see the connections/dependencies of different resources. It’s called Resource Visualizer
A picture of the view Resource Visualizer showed me
The test’s execution was quite straightforward. I essentially just used the following four commands: terraform init terraform plan -out=terraform-run4.tfstate terraform apply “terraform-run4.tfstate” terraform destroy
In the future I have intentions of replicating a similar test to this one with Azure DevOps and Terraform.
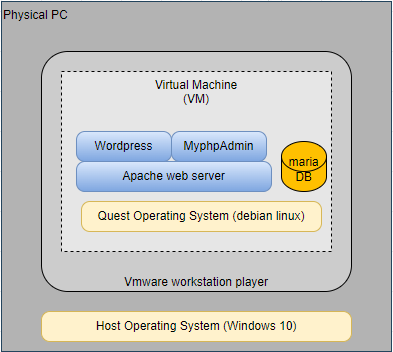
Today I will briefly cover what I have learned from using a Virtual Machine (VM) to run WordPress.
For this project I used the pre-packaged Virtual Machine image for the VMware Workstation player that is provided by bitnami. (More information can be found from the links at the bottom of this post!)
The setup seems to be pretty well done. It was good for learning more about the setup itself as well as the integration. (eg. apache webserver configuration and wordpress configuration for connecting to database.)
The home PC (host OS) is running MS Windows, while the quest OS is running debian linux.
Here is the simplified diagram of all the main components.
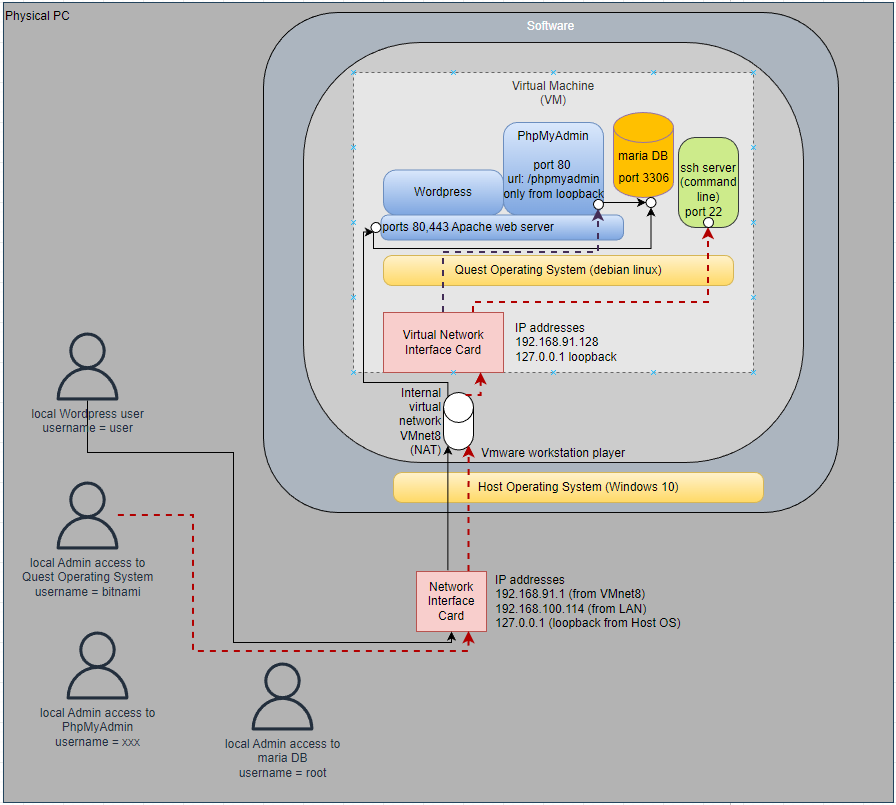
The connections to virtual machine are only possible from the host OS (since the virtual network “VMNet8” of the VMware workstation player does not allow incoming connection from outside).
The figure below shows how the normal wordpress user on home PC can connect to the apache/wordpress; while admin access to quest OS, PhpMyAdmin and Maria DB requires connection to ssh server.
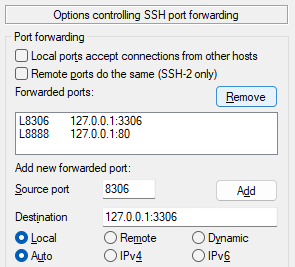
To connect to the PhpMyAdmin or Maria DB, one can use putty with port forwarding.
When the ssh session is opened, local port in host OS is opened by putty and traffic arriving to that port is forwarded to pre-defined destination at the ssh server environment.
Here is a simplified view when tunnel is set up for PhPMyAdmin
When defining the local port in putty, remember not to allow connections from other hosts to the local port that was opened by putty. Bellow a picture for reference:
Hello all, I am back with more news and small projects I’ve been up to.
This time it is a project related to what colors are available in the color picker in draw.io.
Before we get more into this, a quick summary of what draw.io is:
Draw.io is a free online diagram software for making flowcharts, process diagrams, org charts, UML, ER and network diagrams. It can also be downloaded, which is what I have in use at the moment.
Then to the plan and results
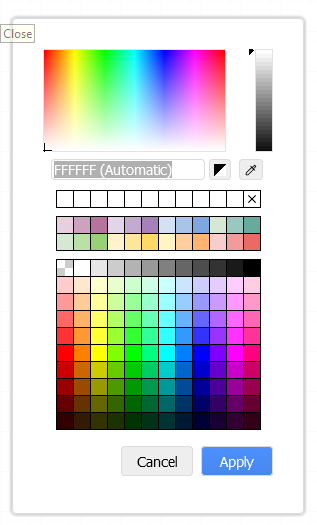
Now, normally the draw.io color picker looks something like this:
While these options are great for their variety, for this project I wanted a simpler assortment of colors, that I was already familiar with.
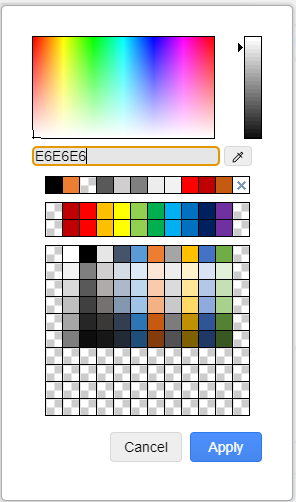
That is how I ended up configuring the colors to look like the options in PowerPoint.
This is how the colors look in PowerPoint, for ease of reference.
That is how I made the following plan of action:
And then had this as the end result:
Not the most elegant looking solution, but it did what I wanted it to.
But how did we get here?
Draw.io is interesting for how you are able to modify it.
From the research I have done, if you know what you’re doing, anything is configurable and can be done following this path:
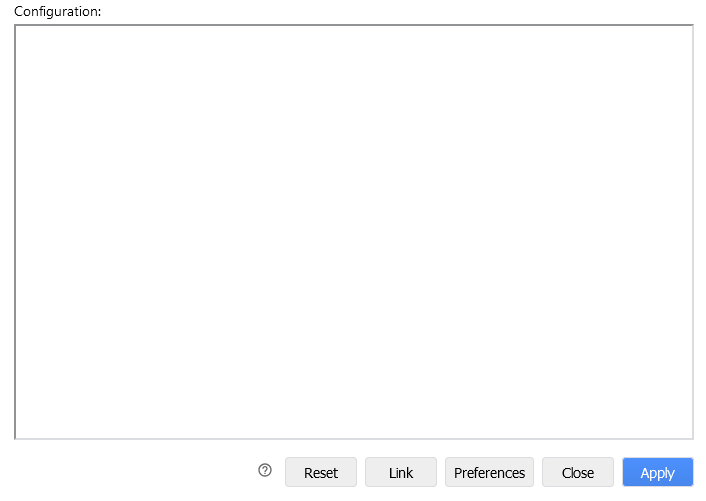
Extras -> Configuration…
Then clicking on “Configuration..” will open this view:
And after entering the wanted JSON configuration, clicking apply and restarting the software, the changes will take effect.
In case anyone would want to try doing the same configuration I will embed what I used bellow:
Hello, once again, and welcome all to an example on how to go from an ER diagram into a DB schema!
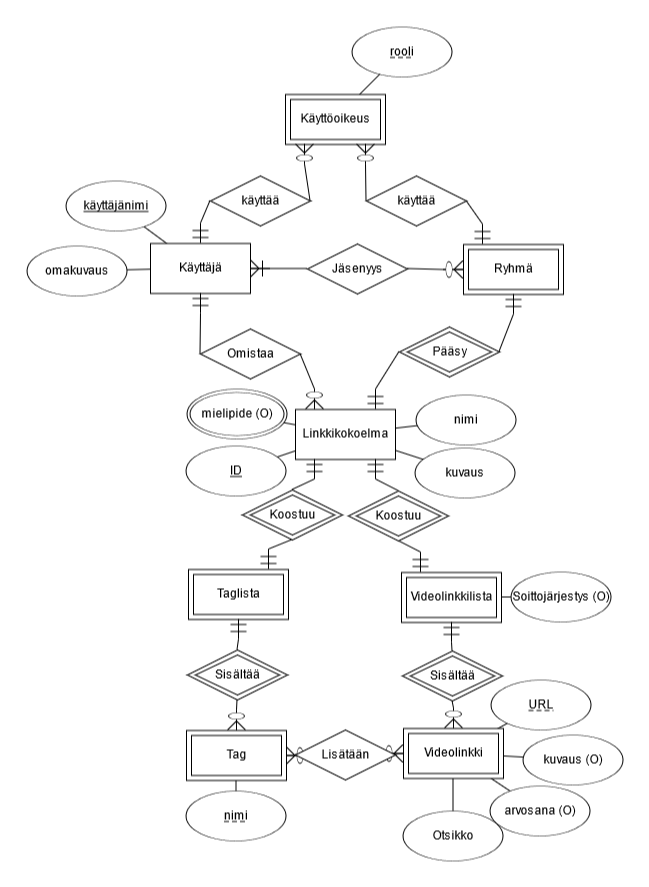
We will look into this example, by usin Videolister, which I did an update on a little while ago. To develop and transform the videolister tool into an online tool, an ER-diagram (ER=Entity Relationship) was made for the new multi-user tool.
I used ERDplus to make it, but draw.io would be just as sufficient.
The ER diagram for Videolister
After making the ERDplus, I used DBeaver program to transform it into a database schema.
SQL/DBeaver diagram of Videolister
Though I used DBeaver to do this, it is also possible to create this using other similar programs, or the SQL language. With similar programs, and in DBeaver, the SQL portions are often created for you and your work in making the schema stays mostly visual.
Here are some examples of SQL that DBeaver created for “Linkkikokoelma” and “Videolinkki” tables:
After the tables have been added and connected visually, it’s time to add data into the tables. Here are some examples using the same tables as above:
Data that was inputed onto Linkkikokoelma tableSome of the data inputed onto Videolinkki table
All in all, I think DBeaver was quite easy to pick up and use (at least somewhat) effectively. It was very helpful in managing the general flow of database creation and modification.
I worked on a project that I am calling Videolister.
The idea for the project came from one of my friends. They mentioned storing link to various ukulele tutorials in a simple text editor, not all in one place, and how it was a chore to go through. So I thought of making a simple tool for maintaining list of links to youtube videos.
This was great for me as I was looking for a java object oriented programming exercise, and I had just found what I was looking for.
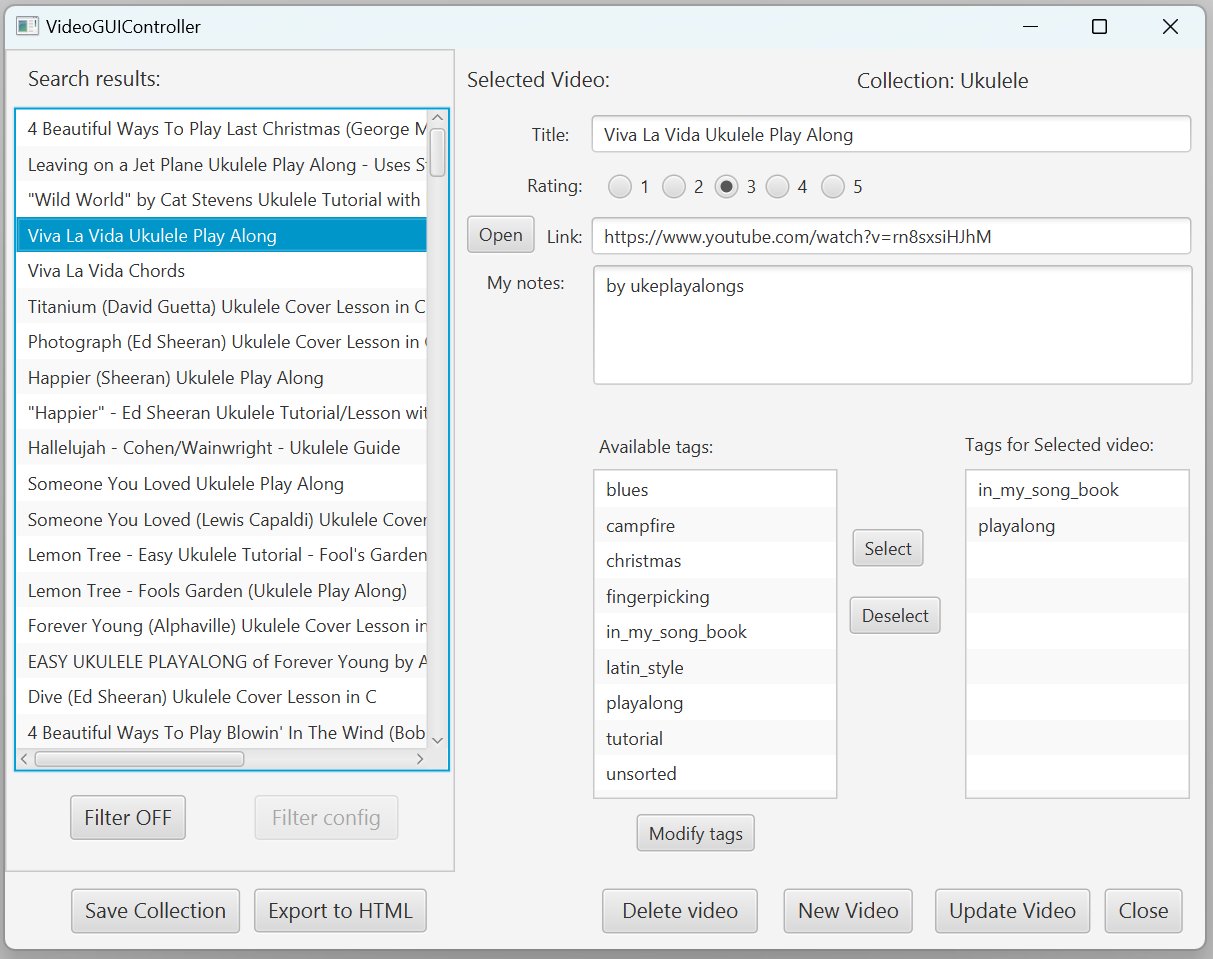
Bellow are some screenshots and explanations.
Here is the main screen of the program, after choosing a List. In this main screen you manage all added videos in the specific List.
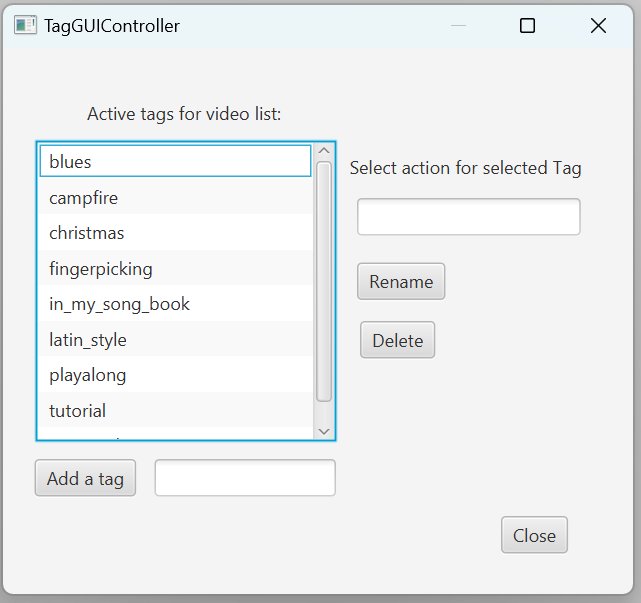
Should you click the “Modify tags” button in the earlier view, you’d be met with this pop-up. In here you create and manage the tags that can then be added to your video for easier identification and searching.
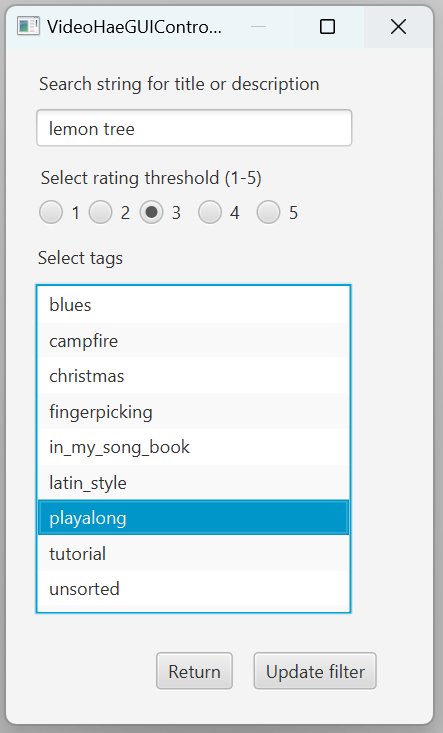
Here is the “filter config” window, opened by the button with the same name on the main screen. It is essentially a rudimentary search system. It applies a filter on every video on the List and only shows those that match the given parameters.
I should have some pictures still saved from earlier versions and other neat things to give a sort of tutorial on how to make one. I might add it here at some point. Who knows?
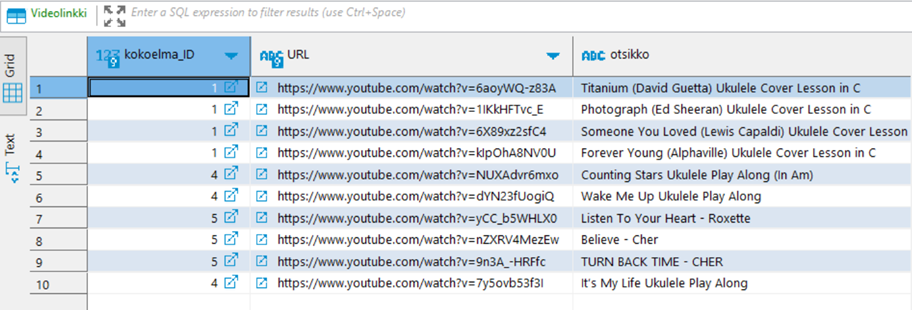
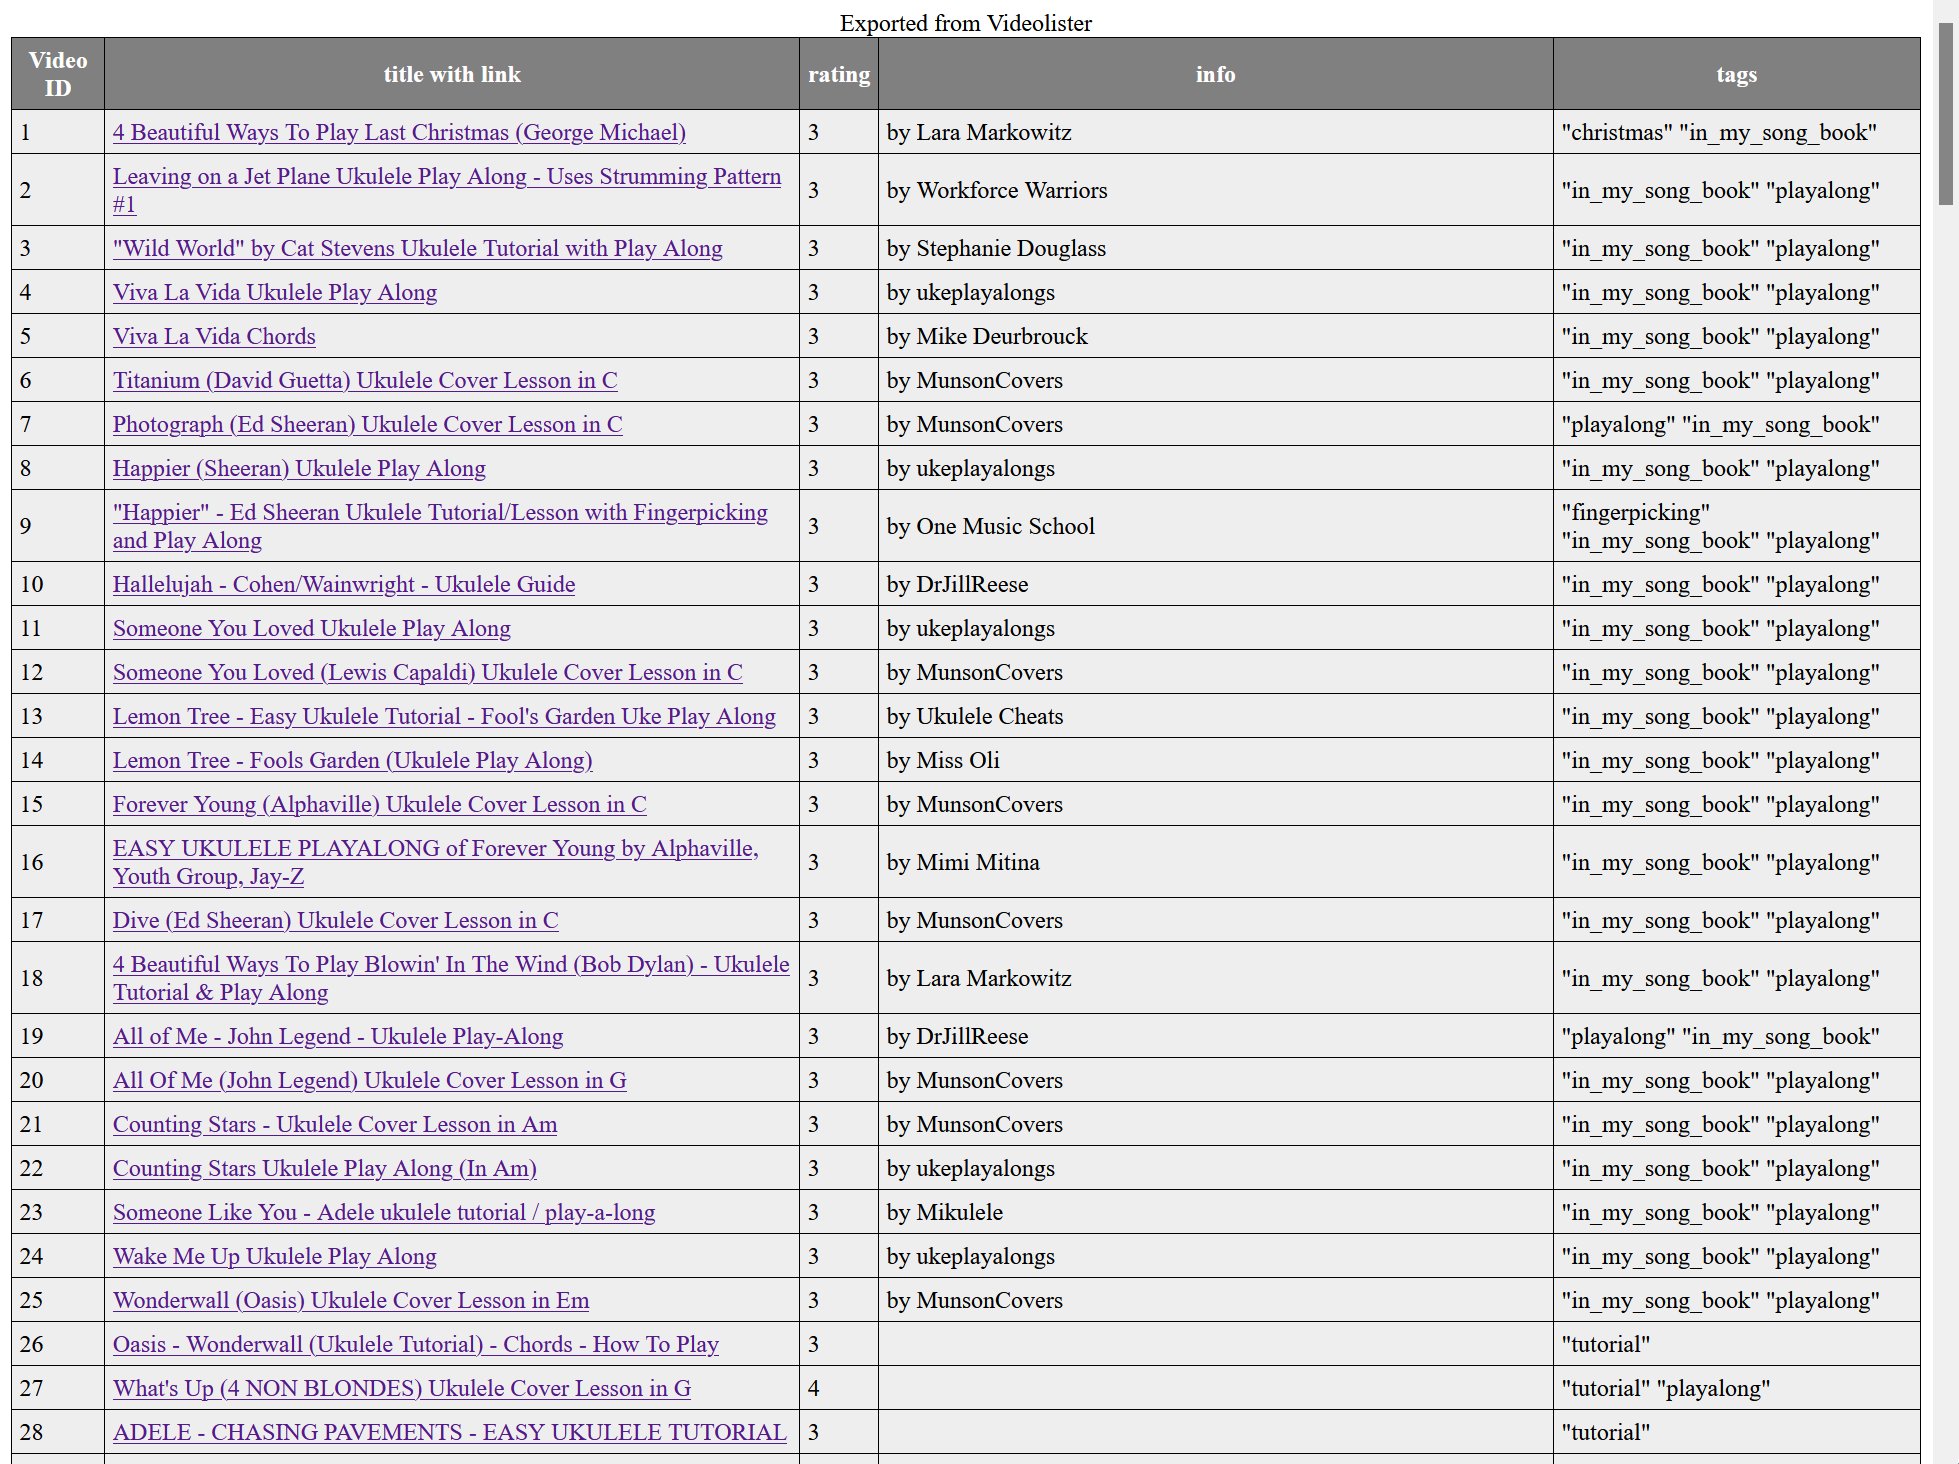
Still there is one more picture for me to share:
This is a printed table of how the data is stored for the program to read. It’s not all the data it needs, but I thought it would be nice to get to see this for some. So there you go!
That was all this time around. Thanks for reading!
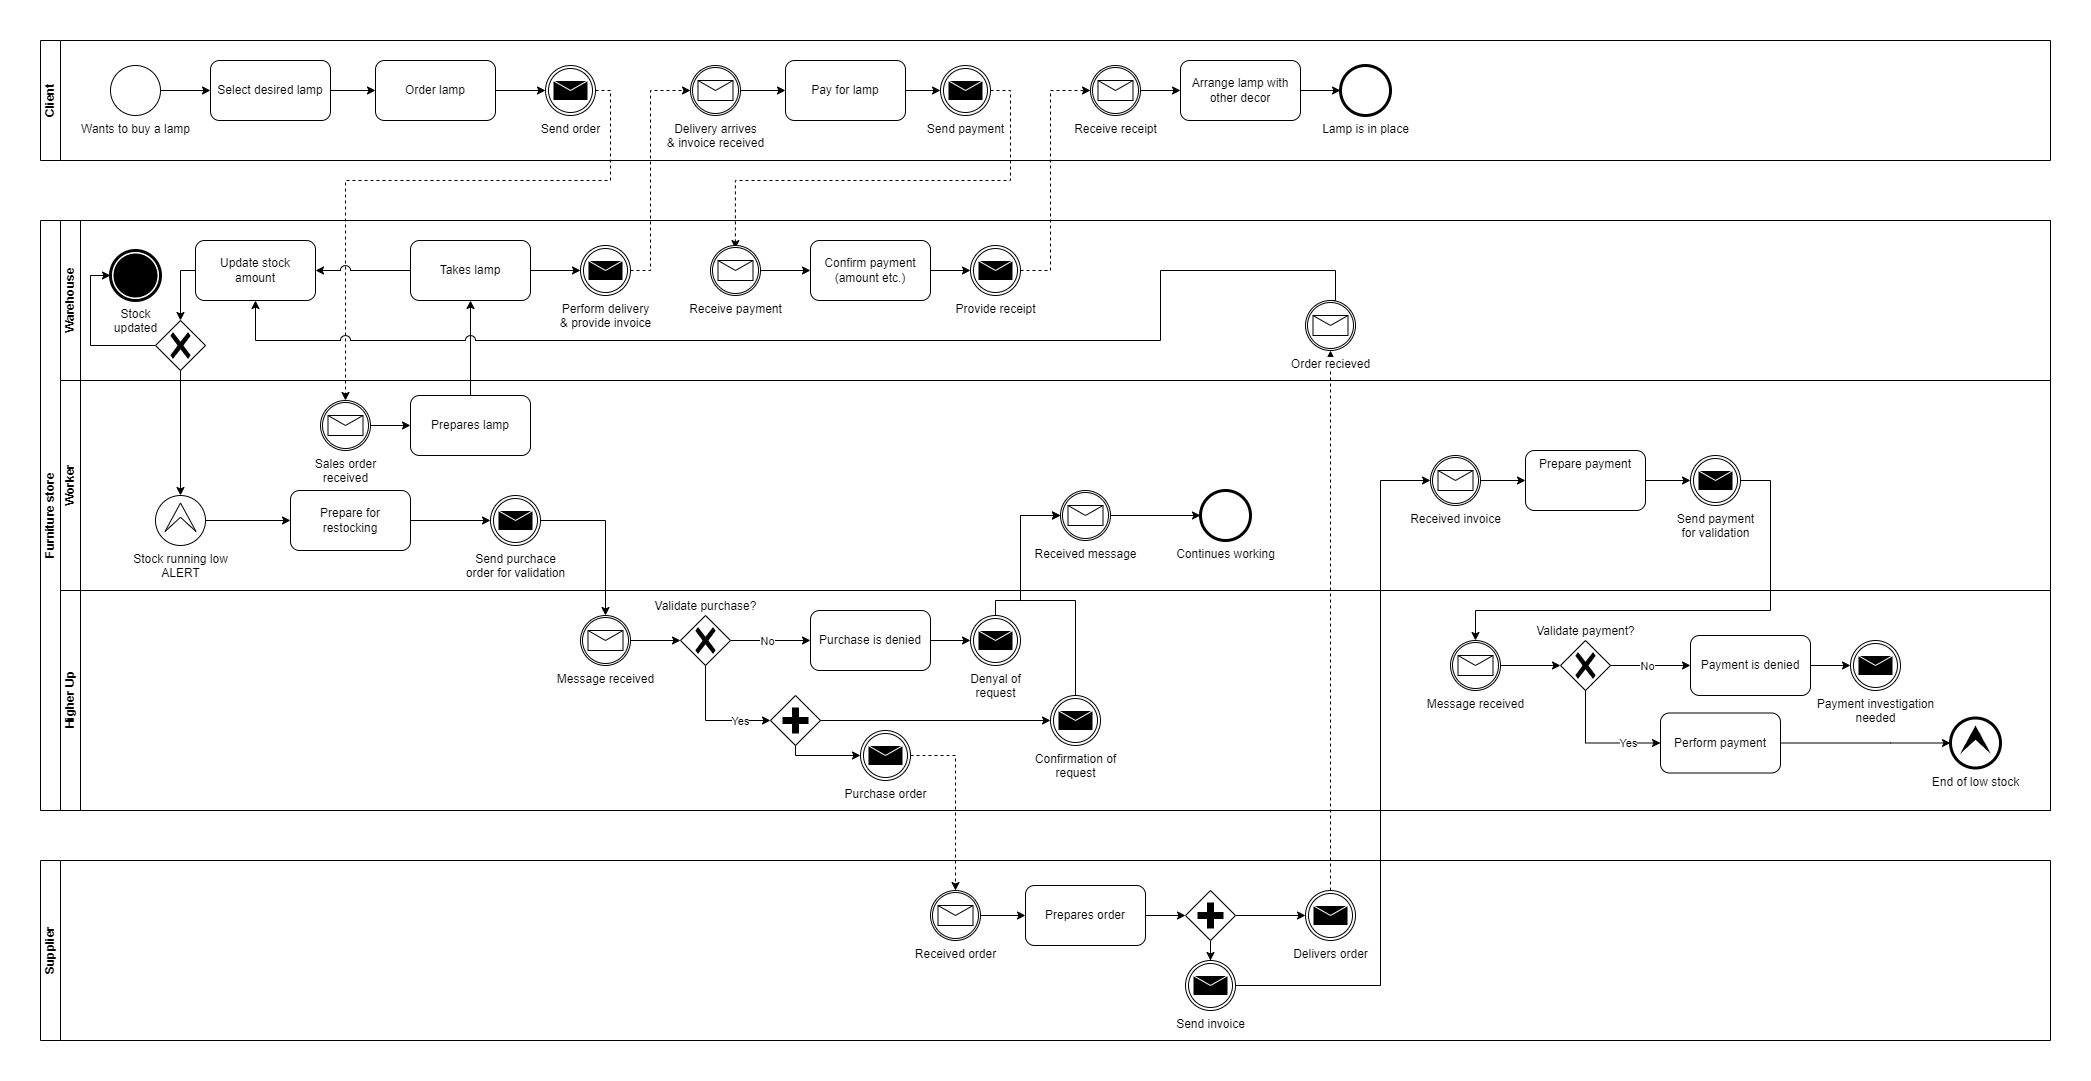
In this post it’s going to be used to make a BPMN diagram as an example, using draw.io’s BMPN 2 tools. The version of draw.io I am using is the standalone version.
Very usefull and handy for doing diagrams. It was fairly simple to use too! Please see the BPMN picture below: